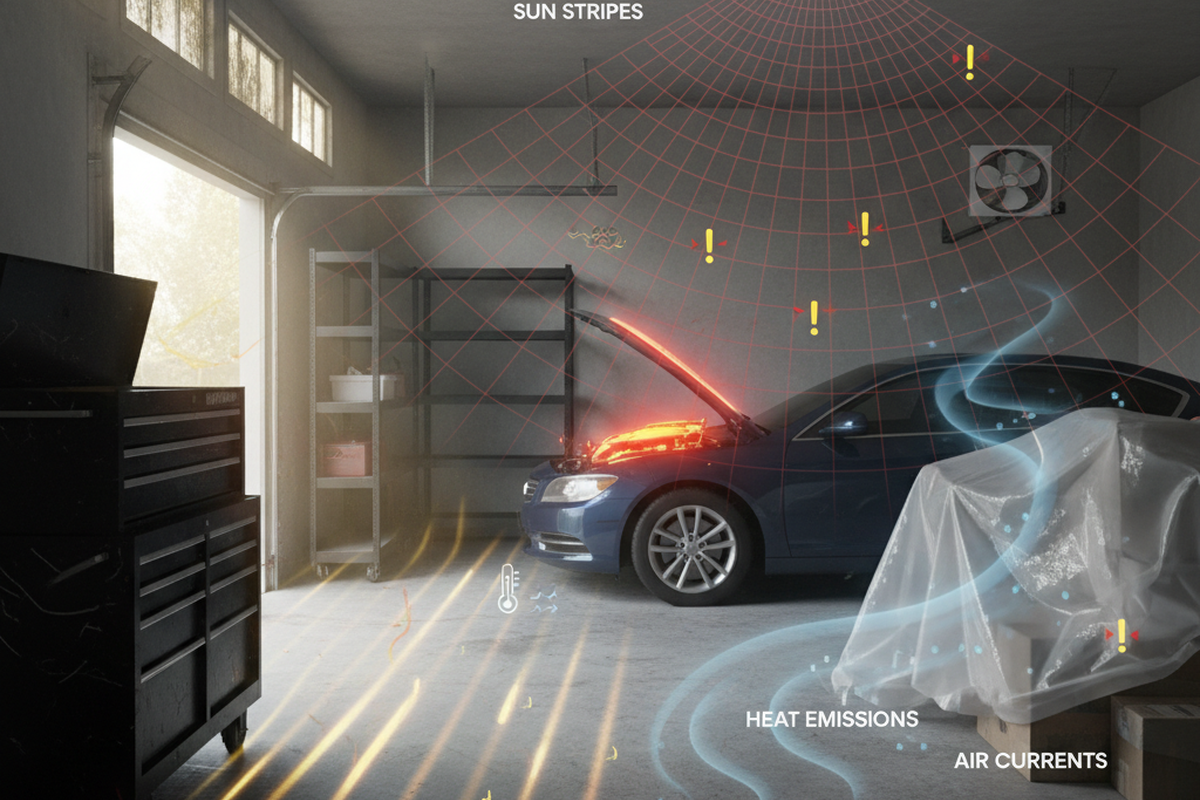
You walk into the pantry, and the lights snap on. Perfect. You grab the cereal, close the door, and walk away. Ten minutes later, however, you notice a glow under the door crack. The light is still on.
You wave your hand in front of the sensor. Nothing. You adjust the time dial. Still nothing. You kill the breaker, wait, and flip it back on. The light immediately illuminates, bypassing the sensor entirely.
Your pantry isn’t haunted. You’ve just experienced the most common failure in modern DIY lighting: a welded relay.
The motion sensor you installed—likely a standard residential-grade unit intended for a few incandescent bulbs—has physically fused its internal metal contacts. Inside that plastic housing, a tiny copper arm slammed against a contact point with enough heat to liquefy the metal. It is now a permanent wire. No amount of waving your hands or tweaking sensitivity dials will separate those contacts. The only fix is the trash can.

This doesn’t mean you bought a “bad” switch. It means you plugged a capacitive load into a device built for resistive ones. The LED strip itself isn’t the problem; the black brick powering it is.
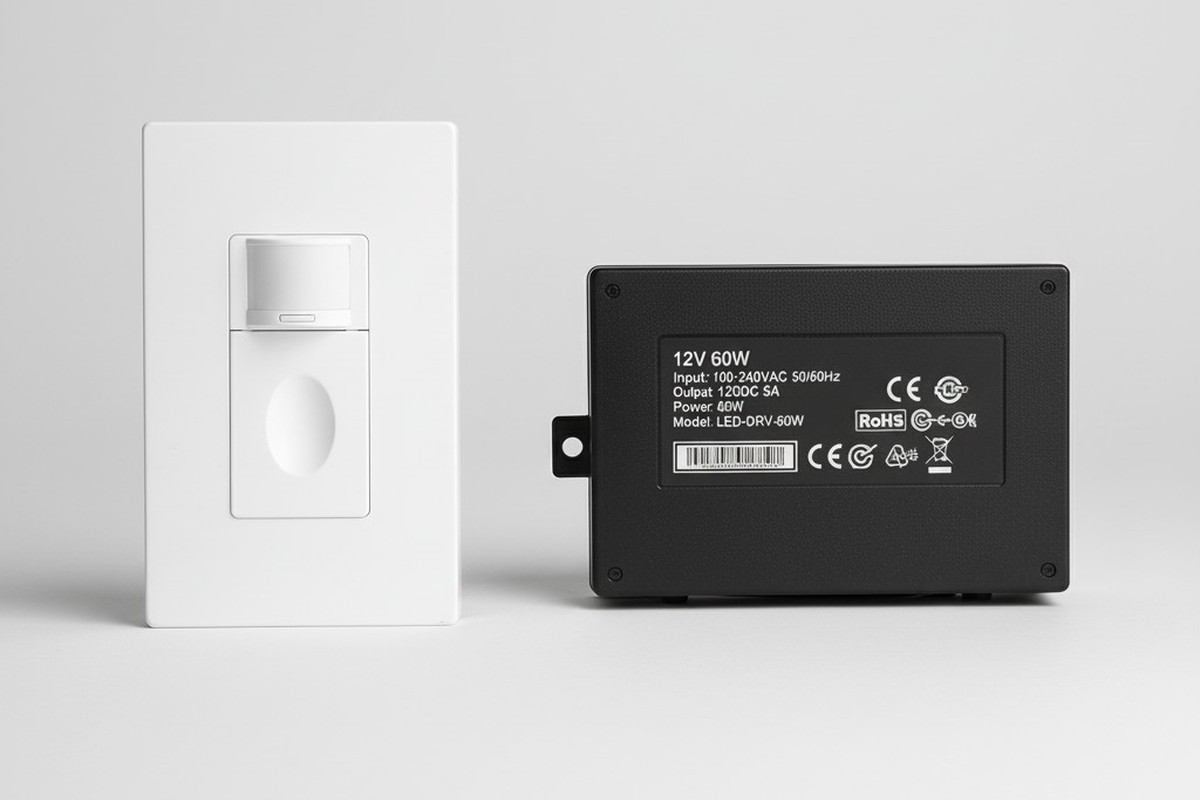
The Wattage Rating Trap
If you look at the back of your LED driver (the power supply), it might read “Output: 12V DC, 60 Watts.” You do the math. Your switch is rated for 600 Watts. You are using 10% of its capacity. You should be safe, right?
This is where the physics of LED drivers betrays the average installer. That 60-Watt rating is the running load—what the driver consumes once it’s cruising along. It tells you nothing about the first millisecond of operation.
LED drivers are essentially massive capacitors disguised as power bricks. When they sit idle (like in a pantry), those capacitors empty out. When the motion sensor clicks “ON,” those empty capacitors act like a black hole for electricity. For a tiny fraction of a second—often less than 2 milliseconds—they pull as much current as the copper wire can physically deliver to fill themselves up.
This is called Inrush Current.
Maybe You Are Interested In

- Occupancy (Auto-ON/Auto-OFF)
- 12–24V DC (10–30VDC), up to 10A
- 360° coverage, 8–12 m diameter
- Time delay 15 s–30 min
- Light sensor Off/15/25/35 Lux
- High/Low sensitivity
- Auto-ON/Auto-OFF occupancy mode
- 100–265V AC, 10A (neutral required)
- 360° coverage; 8–12 m detection diameter
- Time delay 15 s–30 min; Lux OFF/15/25/35; Sensitivity High/Low
- Auto-ON/Auto-OFF occupancy mode
- 100–265V AC, 5A (neutral required)
- 360° coverage; 8–12 m detection diameter
- Time delay 15 s–30 min; Lux OFF/15/25/35; Sensitivity High/Low

- 100V-230VAC
- Transmission Distance: up to 20m
- Wireless motion sensor
- Hardwired control

- Voltage: 2x AAA Batteries / 5V DC (Micro USB)
- Day/Night Mode
- Time delay: 15min, 30min, 1h(default), 2h

- EU plug power adapter

- UK plug power adapter

- US plug power adapter
- 5V DC
- Transmission Distance: up to 30m
- Day/Night mode
- 5V DC
- Transmission Distance: up to 30m
- Day/Night mode
- Voltage: 2 x AAA
- Transmission Distance: 30 m
- Time delay: 5s, 1m, 5m, 10m, 30m

- Load Current: 10A Max
- Auto/Sleep Mode
- Time delay: 90s, 5min, 10min, 30min, 60min
- Load Current: 10A Max
- Auto/Sleep Mode
- Time delay: 90s, 5min, 10min, 30min, 60min
- Load Current: 10A Max
- Auto/Sleep Mode
- Time delay: 90s, 5min, 10min, 30min, 60min
- Load Current: 10A Max
- Auto/Sleep Mode
- Time delay: 90s, 5min, 10min, 30min, 60min
- Load Current: 10A Max
- Auto/Sleep Mode
- Time delay: 90s, 5min, 10min, 30min, 60min
- Load Current: 10A Max
- Auto/Sleep Mode
- Time delay: 90s, 5min, 10min, 30min, 60min

- Occupancy mode
- 100V ~ 265V, 5A
- Neutral Wire Required
- 1600 sq ft
- Voltage: DC 12v/24v
- Mode: Auto/ON/OFF
- Time Delay: 15s~900s
- Dimming: 20%~100%
- Occupancy, Vacancy, ON/OFF mode
- 100~265V, 5A
- Neutral Wire Required
- Fits the UK Square backbox
A generic “60 Watt” driver can easily pull a peak inrush spike of 40 to 60 Amps. To put that in perspective, your entire circuit breaker is likely rated for 15 Amps. The spike is too fast to trip the breaker, but it’s plenty of time to destroy the tiny relay inside your switch.
When the relay contacts move to close the circuit, electricity jumps the gap just before they touch. That 60-Amp spike arcs across, creating a microscopic plasma explosion hot enough to melt copper. The contacts then slam shut on that molten pool, welding themselves together. The “click” you usually hear becomes the sound of your switch dying.
Why the Switch Matters (The Rayzeek R-800)
Most standard motion sensors use one of two switching methods: a TRIAC (solid state) or a small relay. TRIACs are great for dimming incandescent bulbs, but they are notoriously finicky with electronic drivers. They often leak a small amount of voltage even when “off,” causing sensitive LED strips to ghost or flicker faintly in the dark.
Looking For Motion-Activated Energy-Saving Solutions?
Contact us for complete PIR motion sensors, motion-activated energy-saving products, motion sensor switches, and Occupancy/Vacancy commercial solutions.
For a pantry setup, you generally want a relay-based switch—a physical air gap that disconnects the power completely. But not all relays are created equal.
The Rayzeek R-800 series often finds its way into these specific installs because its internal architecture acknowledges the reality of modern loads. The amperage rating on the box matters less than the contact material and the mechanism’s speed. The relays in these units are rated for a “motor load” or capacitive load standard, which is far more punishing than the “resistive load” (like a heater or old lightbulb) that cheaper switches rely on for their specs.

When you hold one of these units, the “clunk” of the relay is audible. That is the sound of a spring with enough tension to break a minor tack-weld if one starts to form. Some configurations also utilize zero-crossing circuitry, which attempts to close the relay when the AC sine wave is at zero voltage to minimize arc energy. It’s not magic, and it won’t survive a direct lightning strike, but it is the difference between a switch that lasts five years and one that lasts five days.
The Driver Game: Flying Blind
You can buy the toughest switch on the market, but if you pair it with a garbage driver, you are still rolling the dice. This is where “Amazon Special” components cause the most headaches.

If you buy a Mean Well HLG or XLG series driver, you can download a PDF datasheet. Scroll down to page 3, and you will find a line item: “Inrush Current: 50A / 230VAC.” They tell you exactly how violent the startup kick will be, so you can plan for it.
If you buy a generic “12V LED Adapter” in a white box with no brand name, that data does not exist. These manufacturers often save money by omitting the NTC (Negative Temperature Coefficient) inrush limiters inside the power supply. Without that internal protection, the driver is basically a raw capacitor waiting to weld your switch.
Get Inspired by Rayzeek Motion Sensor Portfolios.
Doesn't find what you want? Don't worry. There are always alternate ways to solve your problems. Maybe one of our portfolios can help.
Installing a sub-$20 driver on a permanent fixture is a statistical gamble. If you are stuck with a high-inrush driver—maybe the drywall is already up—you have to assume the worst. Since you’re flying blind on the specs, you need a switch that acts as a fortress.
The Nuclear Option: Inrush Limiters

Sometimes, the load is just too big. I’ve seen pantries with 40 feet of high-density COB LED strips driven by 200 Watts of power. In these cases, even a robust relay like the Rayzeek might eventually succumb to the pitting and scarring of repeated 80-Amp strikes.
If you are building a lighting system this heavy, stop asking the switch to do all the work. The solution is to install an external Inrush Current Limiter (ICL) inline between the switch and the driver.
This small device, often looking like a black disc or a small terminal block, acts as a resistor for the first second of operation. It absorbs that massive spike, then drops its resistance to near zero once it warms up. It cushions the blow, turning a 60-Amp hammer strike into a 5-Amp push. It’s a five-dollar part that saves a forty-dollar switch and a Saturday morning callback.
Do It Once
The pantry is a utility space. It isn’t a place where you want to troubleshoot ghosting lights or stuck sensors; you just want to walk in, grab the pasta sauce, and walk out.
Ignore the wattage rating on the box. Respect the inrush current. Use a driver that lists its specs, and use a switch like the Rayzeek that uses a relay capable of handling the kick. If you try to save ten bucks on the hardware, you will eventually spend two hours replacing it. Physics always wins; you might as well be on the winning side.